
The eyelets that dominated the Mugler show are filtering through to the high street – making it high time they made an appearance on Magpie DIY. The hardware juxtaposes industrial influences with luxe vibes, meaning that you can style for either end of the spectrum. And who doesn’t love a multitasking piece? Add to that the use of a hammer and you get a show-stopping top with in-built stress relief!
What you will need:
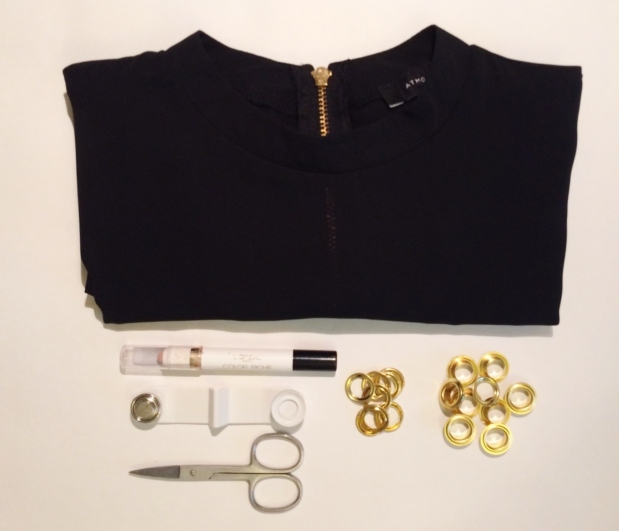
- A top (my chiffon blouse is from Primark)
- Eyelets (available here, tool included)
- Nail scissors
- Pencil (I used L’Oreal’s Colour Riche eyeshadow primer, simply because I could see it on the black, and it washes off easily should you make a mistake)
- Position your eyelets.

2. When you’re happy with the positioning, draw a dot in the centre of the eyelet.

3. Using nail scissors, cut a small cross shape using each marked dot as the centre.

4. Push the raised side of the eyelet through the material, so the raised part is on the inside of your top (you may need to make your incisions slightly bigger to allow the eyelet through). On the inside of the top, slot the disc onto of the raised half of the eyelet. Follow the instructions on your tool kit regarding how to fit the eyelet pieces into the tool.

5. With the eyelets in position, close the tool. On a stable, flat surface, use a hammer (and trust me, it has to be a hammer – I tried other household objects for this part, but none worked), to carefully hammer the tool. Repeat steps 3-5 for the remaining marked dots. NB. These were the instructions provided on my tool kit, but I found that hammering directly onto the eyelet (minus the tool) was much easier.

And there you have it: a no-frills, no-accessories-needed, don’t mess with me piece!

